If you’re looking for a fun and cost-effective means of getting around your city, a Vespa is one of the best options. Vespas are stylish, have excellent fuel economy, and if you opt for one of the more basic models they can be surprisingly inexpensive.
Of course, if this is your first time owning and riding a Vespa, it helps to know a little bit about how this is done beforehand. Not to suggest that riding a Vespa is difficult or anything, but you might have a little bit of a harder time with it if you don’t know what exactly you should be doing.
In this article, we’ll be taking a look at everything you need to know if you want to ride your new Vespa safely and easily the first time.
Do I Need a License to Ride a Vespa?
First thing’s first, let’s go over the licensing you need to be able to ride a Vespa in the first place. You might be unsure of whether or not any kind of license is required to ride a Vespa.
After all, Vespas are pretty slow compared to either cars or motorcycles, right?
Maybe. Not really. But I won’t get into that here. 😁
As it turns out, a motorcycle license is required in most places to ride a Vespa. In most states, a motorcycle license is needed to ride any bike or scooter that has an engine with a capacity of 50 ccs or more.
Since every Vespa has an engine that’s at least this big, a motorcycle license is always required to ride one. However, your state might have some different rules for your 50cc – there are Vespa models sold that have a 30 mile per hour (mph) restriction.
If you have that restriction, your state may not require a license.
That being said, if you buy an electric scooter you might not need a license to ride it. Electric scooters are classified as electric bicycles and aren’t subject to the same restrictions as gas-powered scooters. If you’re interested in such a thing, the Vespa Elettrica is one such scooter.
You’ll find LOTS of opinions on the internet about this, but when in doubt, look into your state’s agency that handles licenses and car registrations. DMV, BMV… whatever yours is called, they will be the true source of truth to keep you from getting an unnecessary (& unwanted) ticket.
What Kind of Riding Gear Do I Need?
If you have the license (or not), the next thing you’ll want to do is make sure you have the right protective gear for riding safely. Despite what you’ve seen in the movies, some level of gear will be desired (if not state mandated).
All gear is simply a way to protect yourself the best you can in the event something bad happens.
The first and most important piece of gear you’ll need to ride your Vespa is, of course, a helmet as the biggest cause of the most serious injuries or even death.
What Helmet Should You Wear on a Vespa?
There are multiple types of helmets to choose from, with each of them offering some advantages and disadvantages over the others.
My full gear recommendations can be found here.
If you’re buying a helmet for scooter riding, however, there are four helmet types in particular you’ll probably want to consider. These are:
- Full-face helmets
- Open-face helmets
- Modular helmets
- Half helmets
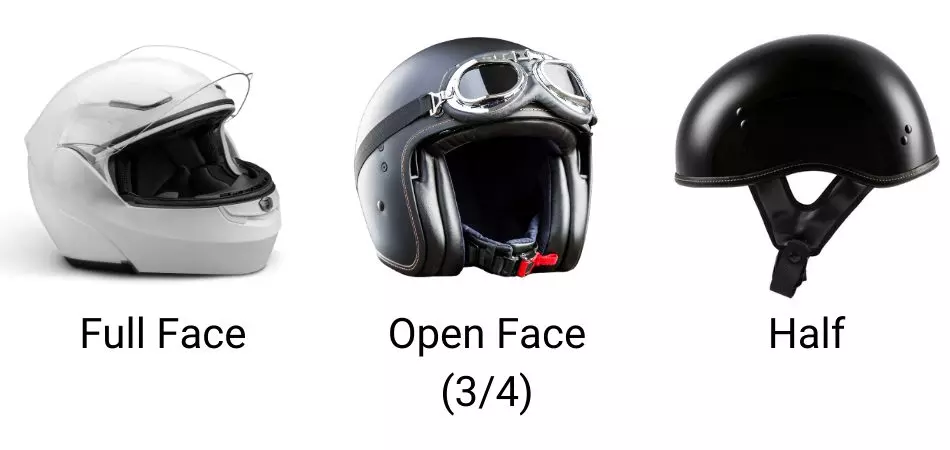
Full-face helmets are by far the safest kind of helmet, as they feature a chin bar that can protect more of your head in the event of a crash.
However, because of their entirely enclosed design, it can get kind of sweaty and uncomfortable in a full-face helmet, especially if you’re wearing it for long periods of time.
Open-face helmets cover the entirety of your head down to the back of your neck but lack the chin bar that full-face helmets have. While this means they don’t have quite the same protection as full-face helmets, they’re a bit lighter and have somewhat better ventilation as a result.
Modular helmets are basically the midway point between open- and closed-face helmets. They have a chin bar like full-face helmets do, but this chin bar is on a hinge and can flip up along with the visor to create an open-face helmet.
With the visor/chin bar up, you can ventilate the helmet more easily, and with the visor/chin bar down, you have a safer helmet. Really, the only downside of modular helmets compared to other types is that they’re a bit heavier and often a bit more expensive.
Finally, we have half helmets. Half helmets, as the name suggests, only protect the top part of your head and don’t extend down to your neck. They also lack chin bars and visors. However, they’re usually pretty lightweight and have plenty of ventilation.
So, what type of helmet is the right one for you as you start riding your future Vespa? This honestly depends on your riding habits, but I wear a full face at all times myself.
If you’re mainly using your Vespa for city driving, you can probably compromise on safety for comfort a little, since you’re likely not going to be riding around at very high speeds.
On the other hand, if you find yourself frequently travelling on high-speed roads on your Vespa, you’re probably going to want something with the absolute best crash protection.
Basically, just consider how likely it will be that you’ll find yourself in a hazardous situation while riding, and choose your helmet based on that.
Just pick one that you’re willing to wear. You can find a free guide by signing up for the newsletter here.
Other Gear
Helmets are definitely the most important gear to have when riding a Vespa, but there are some other pieces of gear that you should also consider using if you want to be as safe as possible.
Your feet and hands are the first things you’ll try to use to help yourself.
Gloves and boots with at least ankle protection are going to serve you well.
A good pair of gloves can help you maintain a solid grip on your scooter’s hand controls, and it can prevent your hands from getting numb if you’re riding your Vespa on a cold day. Slide pads on the glove are even better to prevent broken ankle joints…
You’ll also want to protect the rest of your body, as well. You can look forward to a nasty case of road rash if you happen to get into an accident. To that end, you should get yourself something that can actually protect you if you end up sliding across the pavement, like a motorcycle jacket or riding shirt & pants
Motorcycle pants are always a good option, but you could also wear a pair of reinforced jeans which are a bit lighter and more casual than motorcycle pants.
Some people skip the jackets & pants because road rash is injury prevention & not going to end your life. You won’t find that any state requires a jacket & pants, so choose your gear wisely to fit what is realistic for you as a newbie.
Steps for First-Time Riding
Licensing? ✅
Gear? ✅
You’re pretty much all ready to ride! However, if this is your first time riding a Vespa, there are some things you should keep in mind.
Please know I always recommend taking a class. This article is for the person that won’t.
Regardless, if you’ve never driven a Vespa before, I highly recommend finding an empty parking lot to experiment. I like to go to a big school or church parking lot when the buildings aren’t being used. Empty & not much traffic, if at all! Heavy traffic is not the time to experiment with some new skills here!
Oh, and you’ll want to make sure your practice spot is a flat road. And a paved roads will serve you well, too. Dirt adds a whole different element to riding!
Also know that the standard traffic laws apply to you. Even if you’re practicing, if you are on a public road, you’re expected to ride like a regular driver of a car – public safety after all.
1. Get Acquainted With the Gas and Brakes (at a minimum)
For an automatic transmission (all modern scooters fit this), you won’t have to worry about a clutch.
All scooters use hand controls for the gas and brakes, so you should take some time to get used to how they feel before you do any real riding. These will be the key skills you need to start & stop your scooter.
The right and left lever by your hands (shown below) are your brakes.
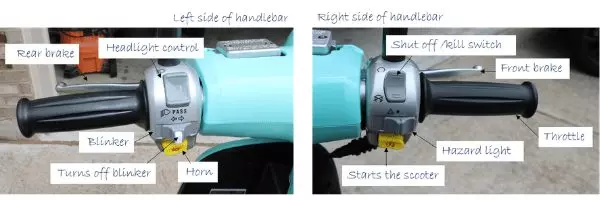
In the Motorcycle Safety Foundation Basic Riding Course, they teach you to depress both at the same time with the same amount of pressure.
Go ahead & try it out. You simply squeeze them in towards you. I was taught to use my full hand, but I’ve seen other riders simply use 2 fingers.
The left brake lever is the ‘front brake’, and the right brake lever is the ‘rear brake’. If you hit that front brake too hard, you can literally cause yourself to fly right over those handlebars. That’s why you are taught to do your best to slowly pull those levers back at the same time.
For the accelerator, you should first try and figure out how much throttle input you need to go a certain speed.
The throttle is the right handle bar grip. You rotate your wrist towards yourself, and that literally makes the scooter go. Even if you are experienced down the road (pun always intended), you’ll want to pull back and play with what it will do – slowly – when you turn on the scooter.
But we aren’t there yet.
It’s important to not underestimate how much throttle input you need to reach a given speed. You don’t want to turn the throttle too far and launch yourself into an intersection unprepared, for example. When you’re first learning how to operate your Vespa’s throttle, try not to make any large or jerky movements.
Smooth & steady will win this race.
Braking is pretty much the same; take a little time to get used to your Vespa’s braking and figure out how strong the brakes are. When braking, it’s always best to apply the brakes on both wheels evenly; don’t favor one wheel over the other.
In addition, when braking, take care that you don’t accidentally twist the throttle at the same time, otherwise you could end up launching yourself over the handlebars.
2. Get Comfortable on the Seat
You’d think how you sit would be the first thing, but I’d rather see you get comfortable goofing off without the scooter on anyhow.
Now that you’re getting closer to getting rolling, you’ll want to sit on that seat if you haven’t already.
If you have the scooter on the center stand, you can reposition yourself & take your feet off of the ground. I am a shorter rider. I find that after I get going on my Genuine Buddy Kick, I prefer to scootch back on the seat further. On the Vespa GTS 300, I don’t move at all.
So I’d play around with the feeling of the scooter on the center stand.
While you’re here, look at what you can see in the mirrors. You can certainly adjust a bit here, but know that your placement may not be perfect yet. It’s ok. You will get the vibe, but it’s a lot easier if you are hanging out without the pressure of riding.
3. Turn on the Scooter & learn the controls
Watch this video to see exactly how to turn the Vespa on & see some of these features in action.
4. Balance – Speed Is Stability
Have you ever tried to ride a bicycle at slow speeds but found it just kept wobbling all over the place? Well, a Vespa is the same way. If you want to maintain more stability, you need to try going a bit faster.
That said, when I took that safety course, they literally had us use our feet to help us coast with the throttle barely going. So the power of the motor was helping our feet, but our feet were still needed – this was meant to help you find the bare minimum of that throttle.
5. Cornering is not intuitive
Stick with just straight at first, but once you’ve gotten a handle on how your scooter accelerates and brakes, it’s time to figure out how to go around a corner on it.
Lower speeds is a bit more intuitive as you turn the handlebars a bit.
If you’re going to ride any two-wheeled vehicle, you need to be familiar with the concept of countersteering, particularly as you speed up.
Simply put, countersteering works like this: when initiating a turn at speed, you need to briefly steer in the opposite direction you want to turn. Doing so will cause the bike to lean over in the direction you actually want to turn, which provides more stability when you actually start to turn in the direction you want.
Countersteering is a pretty subtle technique, and it’s easy to not even be aware that you’re doing it when riding a scooter. However, if you’ve spent any time riding a regular bicycle before, you’ve probably already performed a countersteering maneuver numerous times.
This felt natural to me, but I blame this on being an avid bicyclist before I learned about scooters. So if this makes you nervous, there is something to be said about hopping on a bike before you aim for a scooter if you need to.
6. Practice Makes Perfect
That phrase may be overplayed, but it’s legit. You’ll get more and more comfortable the more you practice, and I have been surprised at how I get nervous if I don’t ride for a month or more for whatever reason.
There is no need to hop on a road that you aren’t comfortable on. Practice where you can feel save & build up your skills.
At that safety course, they recommended that you practice your hard-stopping skills and slow speed turns in empty parking lots even if you ride regularly. Even as a regular rider, you’ll find that you don’t necessarily use these skills often in day-to-day driving, so even experienced riders should practice.
Final Thoughts
You’ll find a bit of confidence each time you ride, so don’t let any initial nervousness stop you from living it up on 2 wheels!